5.29.2015

Home Management Binder

(source)
(OR Just Call Me Mrs. Hughes)

First off, two announcements: Today is my b-day, which is fun though slightly less exciting as an adult! Also, this is the first post ever that I'm posting from my couch...that's right, Strider and I officially have home internet
so fancy!

So, remember back when we built Family File Folders for all of our important documents? Well, now that we've got those under control, the question is: 
"What about the day-to-day info we need at our fingertips?"

Any Downtown Abbey fans out there? 'Cause I imagine Mrs. Hughes has the answer to our daily organization needs. You'd absolutely have to be an expert to manage a house and staff that size! The answer: 
a Household Management Binder!

There are tons of different versions on Pinterest, but most are too detailed for our simple, newlywedish life. Last year, I made a super-organized budget binder for us. Result? Two months of use and the realization that Strider will only use it if it's on the computer. As such, we moved to a digital budget spreadsheet and my creation fell by the wayside. BUT...a Home Management Binder (HMB) for just me to use, well that's something!

After hours of online searching, I realized that our household needs are far simpler than some others. If you need something super-extra-detailed, links to my favorites are at the bottom of this post. If, however, you're like me and just looking for something simple, read on!

First things first, let's think through all our info and needs, weeding out what we won't need to incorporate. 
This may include:

- Basic Household Info: Essentially a family one-sheet, quick-glance info only, but helpful for visitors too!
- Important Dates: We keep these on our super cute perpetual calendar hung in the kitchen.
- To-Do List: I prefer a small purse notebook rather than printed sheets. This app is awesome too!
- Menu Planning/Grocery List: As seen in my post on meal planning, this sheet is a must for my binder.
- Cleaning Checklists: I keep our daily & weekly tasks on the fridge, but seasonal tasks stay in the binder.
- Freezer/Fridge/Pantry Inventories: Though helpful for larger families or homes with extensive food storage, we 
  don't have enough space to merit needing these just yet.
- Password log: We change these too often to print and I prefer to store them more privately than a binder.
- Important Receipts: For items that may need to be returned within the next 30-60 days (esp. clothes).
- Favorite Take-Out Menus: Rarely used but a nice binder addition for off-chance ordering-in.
- Entertaining Notes: Special-occasion sheets, great for people who love to entertaining & organization.
- Address Book: Instead of handwritten sheets (a waste of time these days), I keep a printed copy of our wedding
  guest list spreadsheet in my binder to have important addresses handy.
- Storage Inventory: Keep track of the contents of storage bins the easiest way possible!
- Paint Color Log: For paint-allowed homes (sadly, not us yet), this is a central location to keep track.
- Proverbs 31: Personally, I like to keep a print of this passage handy for encouragement.

Now that you know which pieces & parts of the above you may want to use, you could either make your own sheets or just download these 15 free printables to use instead!

HMB Cover Sheet
HMB Section Tabs
Our Family One-Sheet
Proverbs 31 Printable

DECORATING
Paint Color Log
I also keep a folder here for decor inspiration & swatches...basically, old school Pinterest.

ORGANIZATION
Storage Inventory
I love labels so I keep a pocket folder here as well to corral all my cute label stickers.

COOKING
Meal Planning & Grocery List
Any-Night Meals List

CLEANING
Daily & Weekly Cleaning (suggested)
Daily & Weekly Cleaning (blank)
Annual Cleaning
Room-By-Room Cleaning

BUDGETING
Though we use a digital budget, I keep a pocket folder here for receipts I need to keep during their exchange-return period (usually 30-60 days). I also may use it to keep long-term debt payoff and savings tracking documents here.

SEWING
I keep several printed hand embroidery tutorial sheets here to refer to when I'm working on a project. I also have a few copies of projects I've seen in magazines that I want to save for later. This section may not be helpful for everyone, but it's a good reference for me. I also save measurements here when I do from-scratch projects like aprons or boppy covers.

CANNING
I use this section to stash canning temperature sheets and recipes I want to remember. This is a new practice for me so it's all trial-and-error at this point. (Admittedly, I think I overwhelmed my mother-in-law with my optimism for how much I want to attempt this spring/summer.)

GIFT GIVING
Gift Giving Ideas

HOSPITALITY
Entertaining Notes
Overnight Visitor Notes

ADDRESSES - I keep a copy of our wedding guest spreadsheet in the back of the binder for quick reference


Now, if you're thinking, WOW!...I'd love all of that in one complete file...well, here ya go, friend!:

Complete Home Management Binder


And if you want even more printables or help creating your own Home Management Binder, these are the best, most-detailed HMBs I've found:
A Bowl Full of Lemons
Laura's Crafty Life
I Heart Organizing
DIY Home Sweet Home

Pretty exciting, huh?! Is there anything I missed that you think would be helpful for your day-to-day home?
See you next week for another home management GIVEAWAY!

This post is part of the Modern Simple Homemaking series.
To learn more about this series and see other posts, click the button above.

5.21.2015

Random Household Tips & Advice

(OR Listen To Your Mama!)

Last week, we tackled cleaning the major areas of the home. Today's post doesn't fit under just one room, but instead, is a random collection of all-over helpful advice from various moms and grandmas... they do know best!

- Laundry Detergent: Get an extra load’s worth of soap out of an “empty” bottle of detergent by filling with water, 
  shaking once or twice, and pouring it all into wash.
- Ironing: Use only distilled water in iron to avoid mineral deposit buildup (which drastically shortens iron life). Keep 
  a cheap spray bottle of distilled water nearby as well to use when spritzing items before ironing. To clean iron, fill 
  with equal parts white vinegar and distilled water, steam up, let cool, then flush with fresh distilled water.
- Don't-Dry Items: Use a dry-erase marker to write on the washing machine lid to indicate which items need to
  be pulled from the load before it moves into the dryer.
(source)
- Greasy Stains/Spills: Sprinkle with baking soda or cornstarch to absorb then vacuum.
- Dusty Candles: Wipe down with a cloth dipped in denatured alcohol.
- Musty Linens: Add a “fridge pack” of baking soda to linen closet or cupboard.
(source)
- Air Filters: Don’t forget to check filters every couple months and replace as needed!
- Windows: Clean these on a not-too-hot, overcast day—otherwise, they'll dry too quickly and streak. Use the time-
  tested hint of wiping vertically on one side and horizontally on the other so you can tell which side streaks are on.
- Clean Vases: To clean difficult-to-reach vase interiors, use a foaming denture cleaner tablet.
- Nail Holes: I’ve seen many suggestions online for filling small nail holes with white toothpaste—just don’t. It takes 
  mere seconds to properly fill holes, come on, people.
- Vents: Be careful not to block wall air vents with furniture or appliance air vents with other items or by storing in 
  too-small-spacesboth are damaging to belongings and possible fire hazards.
- Fire Safety: Keep an eye out for exposed wires and be wary of overloading electrical outlets.

______________________________________________________________________________


In addition to the tips above, some amazing women have graciously shared their “mom's top tips” with me! Recognize any that your mom has said over the years?


“No wet towels on the floor. Like, ever.” - Diana S. 
(nasty mildew and a comfy home for creepy crawlies)

"It's silly to worry, and a waste of good time." - Mamaw P.

There's no reason you can't reuse towels—you’re drying off a clean body.” - Sue B. 
(when hung up, two or three uses is fine...no one likes extra laundry)

“Be efficient; turn lights off as you leave a room. Also, get everyone to participate in choreshuge tasks become quick ones with help, plus, kids love taking pride in a job well done.” - Stina V.

"Get your cleaning done as early as you can." - Monica T.
(sometimes challenging to do, but once it's done you can enjoy the day!)

"There's no better way to welcome guests to your home than with a freshly baked dessert. And for the love of all things dear, pick up your empty cups!." - Kaysie K.
(I've been eyeing this cup-corraling project for a while now to help with strays)

"Take your time with your laundry, sorting into delicates, whites, and colors" - Nelle M. 
(plus, close buttons and zippersit really does help clothes last longer)

"Tidy the house before you leave for vacation, especially the kitchen, because no one wants to come back from a relaxing vacation to a dirty home."
 - Amanda B.
(this is a major practice of ours; coming back to clean sheets seems to make the vacation-end less awful!)

"Create a master list of maintenance that needs done around the house throughout the year. That way, seasonal items don't get forgotten and you've got a built-in reminder system." - Kristin A. 

"Use color-free dishwashing liquid to soak out stains in clothing. And, it sounds crazy, but hydrogen peroxide works wonders on red wine carpet spills." - Jill

Last but not least, according to my friend Bond, his mom's advice is: "Don't be a bum."


See you next week for a fun project to keep all your day-to-day routines in order!


This post is part of the Modern Simple Homemaking series.
To learn more about this series and see other posts, click the button above.

5.15.2015

Top to Bottom Clean: Bathrooms, Etc.


Often the smallest and simultaneously dirtiest room of them all, bathrooms are certainly a cleaning chore. However, as with other spaces, having a cleaning regime here contributes to overall home environment and family health.

Once again, working top to bottom:
*Tip: start by coating toilet bowl with cleaner and allowing it to sit for a few minutes while you work on other areas.*


- Ceiling & Walls: Check corners for cobwebs or dust buildup.
- Mirrors: Use glass cleaner to get toothbrush splatters, especially on the lower portion.
- Shower/Tub: I’ve found the easiest way to clean the shower is when you’re actually in it—like literally in the
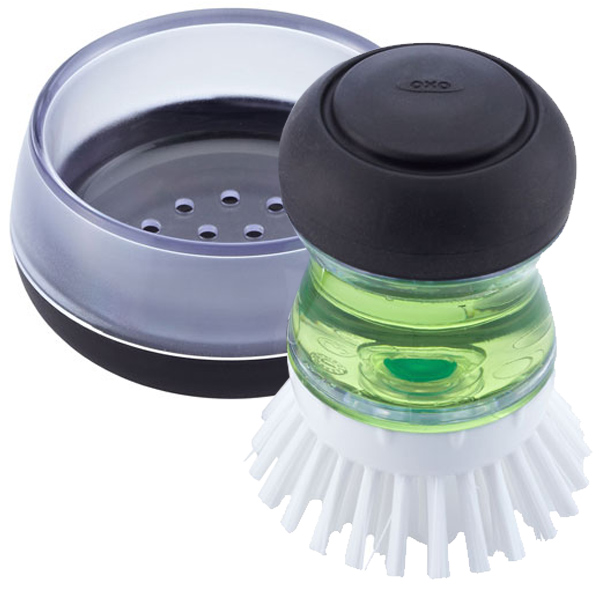
  process of showering. The steam and running water make the job much easier! A dispenser-scrubbie filled with
  dishwashing liquid works remarkably well. Whether you go this route or a shower-specific spray, make sure to get
  walls, ledges, and especially the “ring area” which tends to form on the lower walls, between 3-5” from the tub
  bottom. Use a squeegee on glass doors between cleanings and shower spray during heavier cleaning. An old
  toothbrush does wonders on door tracks. For curtains liners, wipe these off to prevent mold/scum buildup.
(source)
- Surfaces: Use disinfectant wipes or all-purpose cleaner to wipe down any wall shelving, inside any cabinets,
  countertops, and the back ledge of the toilet.
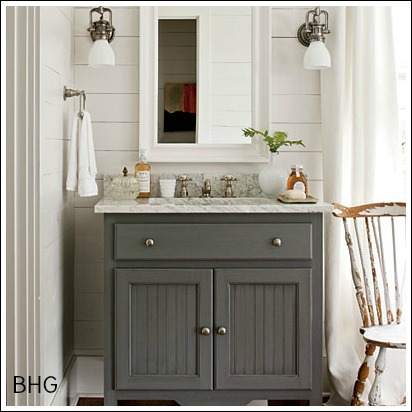
  Note: Regardless of space, aim for minimal countertop toiletries. For health reasons, it's especially recommended
  to keep toothbrushes in a breathable but closed area.
Gorgeous and clutter-free. (source)
- Sink: Disinfectant wipes are great for sink basins and faucets; old toothbrushes are handy for detail scrubbing. 
  For maximum shine on faucets, buff with a dry towel after cleaning.
- Toilet: Now that the cleaner has had a chance to sit, use a toilet brush to scrub the inside of the bowl and rim, 
  then flush cleaner away. Use disinfectant wipes on seat cover, seat (top and underside), and upper rim of bowl.
  And don’t forget to restock TP and periodically bleach the brush.
- Towels: Remove hand and bath towels and replace with freshly laundered ones.
- Floors: Empty wastebasket and sweep floor area, taking time to either shake out or launder floor mats 
  according to care instructions. Finally, use mop or Swiffer to finish off floors. 

Not so bad, was it? I’ll be honest, bathrooms are my very least favorite area of the house to clean BUT there is also nothing I dislike quite so much as using a gross one. I guess its an unavoidable evil necessity.

Now that our major home areas are all “spick and span” (what a strange expression though), let’s not forget about a few other minor spaces to not overlook:

- Front Entry: A simple doormat and cobweb-free front entrance are always welcoming. Keeping the path swept
  and junk-free is a great way to reflect your home’s inner order.  
Simple, clean, and oh-so-inviting! (source)
- Laundry Area: Have a designated home for cleaning supplies and laundry, no matter how simpleeven baskets 
  on the floor look better than just a pile of clothes. Aim to keep shelves moderately organized but definitely free of
  sticky detergent spills.
- Ironing: We don’t yet have a designated “ironing area” but instead, just try to keep iron, board, and other 
  supplies close together. Hanging the board behind a door for storage is also a great Pinterest tip!
(source)
- Cleaning Supply Storage: Maximize storage space under sinks by using plastic bins or even tension rods to
  hang bottles. Inexpensive cleaning caddies are also an option as well as over-door shoe organizers. 
(source)


For an even more in-depth look at each room with printable checklists, check out the Beginner’s Guide to Cleaning Series on Living Well Spending Less. So detailed!

And thank goodness, now all our major cleaning is done!


This post is part of the Modern Simple Homemaking series.
To learn more about this series and see other posts, click the button above.

5.14.2015

Top to Bottom Clean: Kitchen & Dining Area

Basically the same as our kitchen....haha...or not! (source)

Full disclosure, deep cleaning the kitchen can be a real hassle. However, it is really important and thankfully, much easier to manage if you stay on top of it. And if you missed the earlier posts on Living Rooms and Bedrooms, check those out for more tips too. Let’s dig in!

- Ceiling & Walls: Check corners for cobwebs and dust buildup, as well as walls for splatter.
- Ceiling fan: Reminder—use this method for quick, easy cleaning. If blades are especially grimy, consider taking 
  them off the fan entirely and scrubbing with disinfectant wipes or all-purpose cleaners.
- Light fixtures: Chandeliers and light fixtures can get pretty dusty. Use a lightly damp cloth or glass cleaner to 
  touch these up periodically.
- Windows: Kitchen windows are a wonderful thing, but don’t forget them and their treatments when deep
  cleaning. Splatter-free & sparkling glass is nice too!
- Air Vents: Be careful to keep vent covers free of grease buildup, which is easy to happen in the kitchen.
- Upper Cabinets: Don’t forget to clean up cabinet faces which can become grimy with grease, fingerprints, 
  splatter, etc. Murphy’s Oil is a good solution for wooden fixture cleaning.
- Oven Hood: Check the manufacturer’s instructions for how to clean the vent if necessary, otherwise, use 
  disinfectant wipes to remove built up grime on the top and underside of the hood.
- Fridge Top: Don’t neglect this oven-overlooked surface; dust and grime love this hard-to-reach area.
She recommends an Enviro cloth - I haven't used these but wipes seem to work just as well! (source)
- Microwave & Toaster: Whether you have a built-in or countertop model, cleaning the inside of the microwave is
  a must. Microwave a cup of water with a bit of vinegar in it until it steams up a bit. Let it sit a few minutes, remove, 
  then use a damp cloth to wipe messes away. Empty toaster crumb trays too!
- Stovetop & Drip Trays: Clear up stovetop messes well depending on your cooking surface's needs—some need
  specific cleaners, others are fine with disinfectant wipesAnd for those of us still using drip trays, use Bar Keepers
  Friend or a baking soda and vinegar solution to scrub trays till shiny and fresh. Full experiment here!
- Dishes: This is a great time to make sure all your dishes are clean and put away or loaded into the dishwasher. 
  (If you have a dishwasher, check manufacturer recommendations on deep cleaning that as well.)
- Sink: Wipe down sink walls and basin as well as faucet. To freshen drains: sprinkle with baking soda, rinse with 
  white vinegar, wait 15 minutes, then flush thoroughly with hot or boiling water. 
(source)
- Countertops & Surfaces: Personally, I love disinfectant wipes for general countertop cleaning, but an all-purpose
  cleaner works well between food prep. If you have specialty counters such as marble, cork, or bamboo, be careful
  to treat them as needed. Depending on your dining table and chairs, special treatment may be required as well. 
  Don’t forget to launder tablecloths and runners periodically too!
- Lower Cabinet Faces: Ditto for the upper surfaces. Magic Erasers are great for shoe scuffs on lower faces.
- Oven: I’ve seen a number of cleaning suggestions for ovens online but most involve harsh cleaners or ammonia,
  which I don’t love. Frankly, my best suggestion is to be careful to prevent spills in the first place. When a mess 
  does occur, use your best judgment as to whether a deep clean is needed or simply letting it soak under a hot, wet
  rag to be wiped out will do the trick.
- Fridge: Disinfectant wipes are a great tool here. Minimize spills and yuckiness by keeping the fridge nicely 
  organized to begin with. When spills do happen, spot clean them with a wipe. Consider using plastic bins or 
  baskets to contain like food items, which are easy to remove and clean. Deep cleaning the fridge annually is 
  still best to do with a secondary cooler and by just removing shelves one at a time.
  TIP: Clean under the fridge by using a tube sock over the end of a yardstick!
  TIP #2: Use an old/cheap toothbrush to detail clean fridge parts, especially the rubber door seal gaskets.

(source)
- Trash: Take out garbage and wipe down the interior/exterior of the trash can to help eliminate lingering odors.
- Floors: Finally, sweep up the floors, mop or Swiffer, shake out any rugs outside or vacuum mats if possible. 

Done and done! The kitchen often feels like the most work because it has so many areas that require cleaning while also seeming to accumulate the most grime. However, a clean, fresh kitchen is both a great inspiration for cooking and a good reinforcement for healthy food handling and storage. 

If you’re especially ambitious, super deep kitchen cleaning can also include once-a-year washing of every dish/platter as well as wiping out the cabinets as you do so. Let’s not think about that too much though!


Next Up: Bathrooms & Misc.


This post is part of the Modern Simple Homemaking series.
To learn more about this series and see other posts, click the button above.

5.13.2015

Top to Bottom Clean: Bedrooms


Usually the coziest room in the house, bedrooms are like sanctuaries to many people. As such, keeping this area clean will not only create a more peaceful place of rest, but also a healthier respite. Many items here are the same as what we’ve already tackled in the Living Room, so check out that post for more detail on specific tips.

- Strip the Bed: Launder sheets and pillowcase, but don’t forget to periodically wash the mattress cover and pillow 
  covers as well. Note: Pillow covers are pretty inexpensive, healthy, and extend the life of pillows—this wasn’t a 
  common practice for me growing up, but now, I definitely see the value in it!
- Ceiling & Walls: Mostly just checking corners for cobwebs or dust buildup.
- Ceiling Fan: Reminderuse this method for quick, easy cleaning.
- Air Vents: Bedroom air vents seem extra important to keep clean since they affect the air we breathe during 
  sleep, am I right? Light dusting or a remove-and-wash are both helpful!
- Blinds & Curtains
- Wall Art & Lampshades
- Surfaces: As with the Living Room, don’t cheat yourself with dusting surfaces by just going around items. Take 
  everything off, dust items then the surface, then replace photos and knick knacks. 
- Make the Bed: Who doesn’t love Fresh Sheet Night?! Though “the olden days” employed a more elaborate 
  layering method for making up the bed, I think a simpler setup works just as well: fitted sheet, flat sheet, and 
  comforter/quilt/duvet with extra blankets available on the side.
  >> 
Sheets: Though I do use the “hospital corners” method for the foot of the bed, I prefer to leave the sides 

  untucked as it makes it easier to get in. Strider, however, would prefer to sleep in a straightjacketweirdo!
  >> Pillows: Though decorative pillows can be nice, they are usually more work than they’re worth. Keep pillow 
  arrangements simple, finding one high-impact accent that can do the job with minimal fuss.
- Floors: Vacuum or sweep & wet-mop accordingly; don’t forget about area rugs. 

Bonus Idea: Folding & Storing Sheets
I’ve seen tons of ideas for folding sheets online--some great, some a bit illogical. Regardless, well-folded sheets really do make storage much pleasanter. 

Growing up, my family put pillowcases in a separate stack from sheets and basically just dug around in the closet, grabbing whichever pieces we found first. I don’t recommend ithaha.

This method works beautifully for us with minimal fuss:
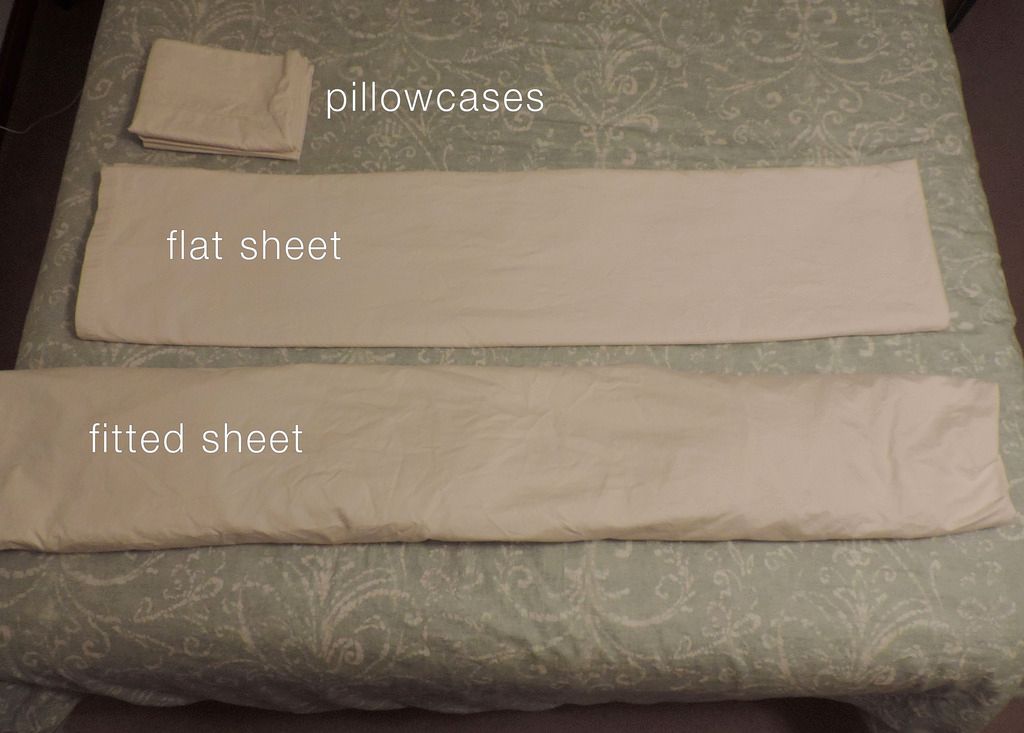
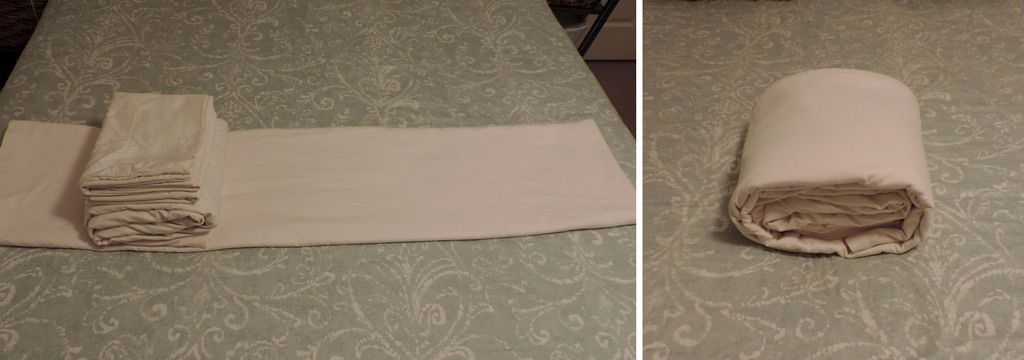
First, grab a partner if possible because, as everyone knows, folding sheets is way easier with a buddy! Start with the flat sheet, making the first fold along the longest length (a “hot dog fold” if you like). This crease will also serve as your midline next time you’re making up the bed. Bring it together into a “hamburger fold” across the mid-line then again along the long length. This will make a long, thing flat surface. Set it aside (trust me!). 

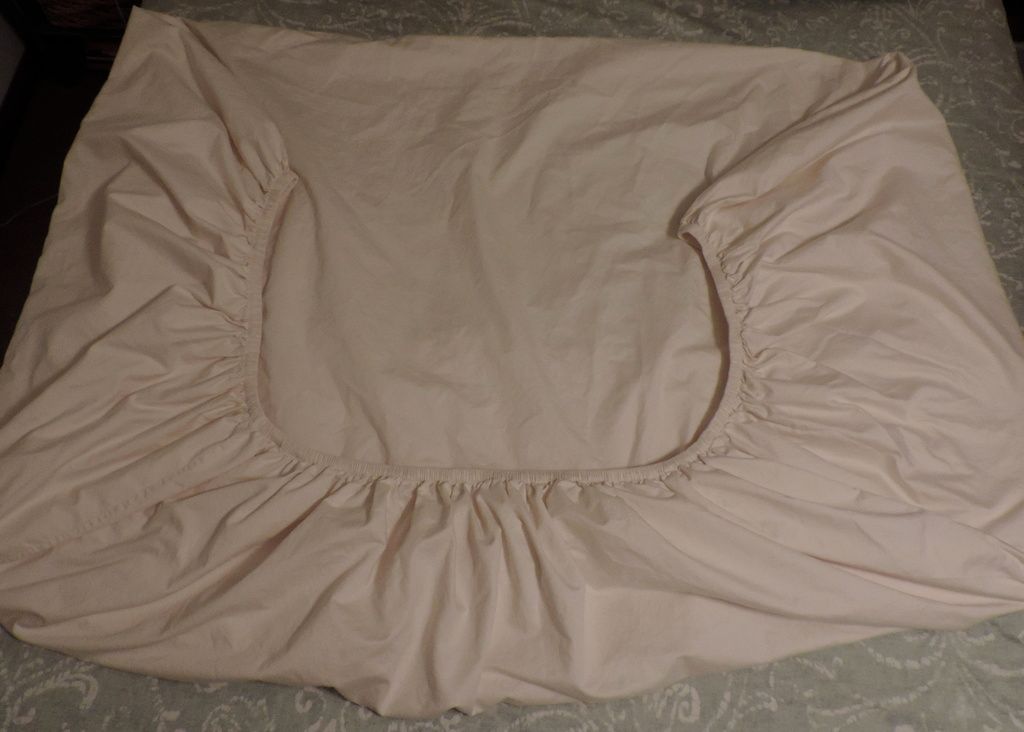
Next, tackle the fitted sheet. Invert one corner and tuck it into its partner, then grabbing the now-corner-less side about 8” from the edge, which will create a straight line with the double-corner-pocket. 
Continue to fold as normal until it is in a small rectangle about the same width as your folded flat sheet (this can be easier or more difficult depending on the sheet style). Set in onto the flat sheet about 10” from the edge.
Fold pillowcases into small rectangles and stack on top of the fitted sheet.

Now the brilliant part! Pull the edge of the flat sheet over the stack and continue to roll it all together until you have a tight little sheet pod. 
Not only do these sheet sets store extremely well, you can also rest easy knowing that every pod has a fitted sheet, flat sheet, and two pillowcases inside. No more hunting down missing pieces! If you have an incomplete set, simply create a new “set” however you like.
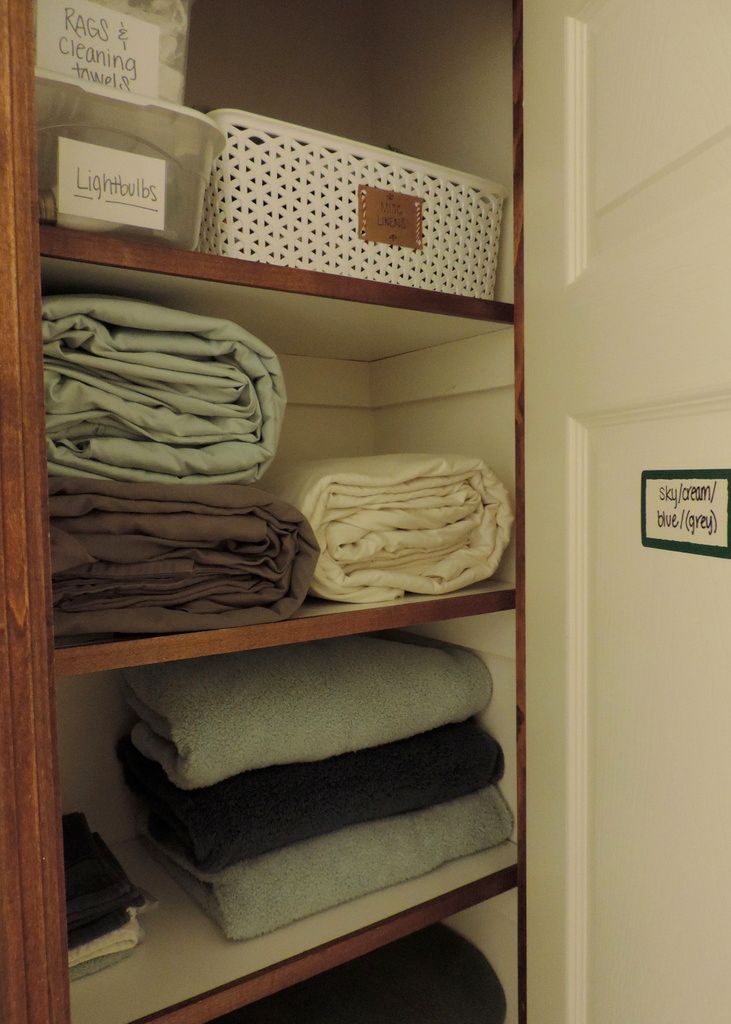
Also consider creating a Sheet Rotation Schedule. It may sound crazy, but to help create even wear across sets, make a list of which order sheets should be used in. This can be taped up inside the linen cupboard with seasonal sets listed in parenthesis to be skipped during off-season, as with our heavier grey set. 

Next Up: The Kitchen!


This post is part of the Modern Simple Homemaking series.
To learn more about this series and see other posts, click the button above.

5.11.2015

Top to Bottom Clean: Living Room


Okay friends! In this week’s four mini-posts I’ll be looking at detail cleaning one room at a time, touching on the four major living areas: Living Room / Bedroom / Kitchen / Bathroom. 

Lots of this information overlaps between rooms, but I’ll also be including helpful tips for tackling specific items in each room. Naturally, there are plenty of speed cleaning lists online as well as much more in-depth deep cleaning lists. Feel free to simplify or extend your cleaning regimen depending on how much time and determination you have. And if haven’t yet, make sure you have all your products and tools on hand before you start!

The living room is a hugely important area to keep tidy as it's usually the most high-trafficked room in the house. Whether you have a formal living room and a den or just one all-purpose living space, the same routine applies.

As with all housekeeping, working top to bottom is essential. 
And fun music. Seriously, so importantThat being said:

- Ceiling & Walls: I’m not an advocate for wiping down walls on a routine basis—too much work. Instead, just 
  check corners for cobwebs or dust buildup.
- Ceiling fan: Hands-down, the best way I’ve found to clean ceiling fans is to commit an old pillowcase to the task.
  Slide the open end over one fan blade, pinch the edges together, then slide the case off, pulling all the dust off 
  with it. Repeat for each blade. The dust will fall tidily inside the case, which can then be turned out outside or 
  simply tossed into the wash. Easy peasy.
source
- Air Vents: For a quick clean, dust vent covers with microfiber cloth. To deep clean, remove covers, wash with 
  warm soapy water, air dry, and replace. (Usually an annual task.)
- Blinds & Curtains: For generic blinds, simply turn them to the “closed” position and use disposable dusters or a 
  dry microfiber towel to collect excess dust. For other styles, check manufacturer cleaning recommendations. 
  Curtains can usually just be tossed into the laundry, but check tags for cleaning suggestions just to be sure. Air dry
  and iron before re-hanging. (This is usually just a once/twice-a-year task for me.)
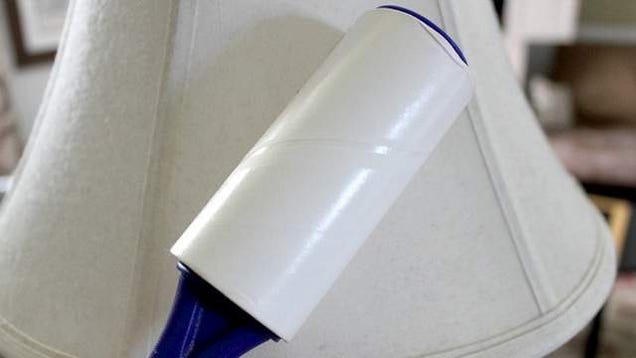
- Lampshades: Sticky lint rollers work wonders on most styles!
source
- Television: Though there are electronic-safe cleaners out there, I recommend just a dry cloth and a very light
  touch with today’s flat-screen models.
- Wall Art: Make sure to dust frames hung on the wall. Use either a duster or dry towel with a light touch. 

By now, you should have the top portion of the room finished and all dust knocked down to the lower half. 
Halfway done!

- Surfaces: Dust all surfaces (bookshelves, end tables, entertainment console, etc.) still working from top to
  bottom. Don’t shortcut yourself and just dust around items either, take the time to remove things, cleaning them if
  necessary as you do go (picture frames are notorious for dust), clean the surface, then replace items. Usually 
  a duster or dry microfiber cloth is good for everyday cleaning. For deep cleaning, consider the type of surface
  (especially wood) and make considerations if special care needs to be made.
  Note: Overwhelmed by how much there is to remove from surfaces? Consider simplifying your knick knacks.

 Gorgeous space with minimal surface clutter! (source)
- Furniture: For a quick clean, use a lint roller to go over main furniture surfaces. To deep clean, remove cushions
  and use a vacuum attachment to clean cushions and under-cushion areas. Also either spot treat or toss
  pillows/pillow covers in the wash (semi-annually). Take care for special cleaning of leather furniture.
- Floors: For quick cleaning, either vacuum or sweep/wet-mop, depending on your floor covering. For a more
  thorough clean, use a lightly dampened cloth to wipe down baseboards before doing floors. Once or twice a year,
  move furniture to clean under those pieces as well.

There you have it! A perfectly clean living space to enjoy with family and friends.
Plus, a big check off our housecleaning list!

Next Up: Bedrooms!

This post is part of the Modern Simple Homemaking series.
To learn more about this series and see other posts, click the button above.


5.09.2015

Household Cleaning

(OR A Petition to Keep Saturdays Fun)

Welcome back, friends! 
Today’s post launches part three in the Modern Simple Homemaking series: Keeping Things Tidy 

Yup...housekeepingNow, before you stop reading and run away, keep in mind that there are very good reasons for keeping a house clean and surprisingly easy ways to manage it. 

First, the reasons. So why do we bother with keeping a house clean?
- It just looks better. Simplicity & budget are big purchasing factors for us when buying household items and 
  frankly, even the least expensive (Craigslist) belongings look nicer when tidy.  
- Cleanliness = healthiness. Dusty, grimy surfaces are breeding grounds for critters, sickness, and allergens. 
- It reduces stress. A well-managed environment mirrors a well-managed mind. When the outside world is 
  chaotic, a clean home provides relief and peace. Plus, it makes it plain easier to find stuff!
- Helps with priorities. When Strider gets home from work, a clean house helps me enjoy our time together, 
  rather than being nagged by the neglected chores I put off. 
- It’s welcoming! If things are tidy at home, there’s no reluctance to jump at opportunities to invite guests in.
- It saves us money. Stuff's just less likely to be broken or lost.
Now that we understand why we bother with cleaning, let’s round up the arsenal.
Though there are cleaning products out there for anything you can imagine, it doesn’t really require much. 
Note: I try to avoid heavily scented cleaners. Despite their best efforts, no company’s chemical scent is ever as pleasant as open windows or lighting a single, good-smelling candle.

To caddy or not to caddy? Many people recommend using a cleaning caddy to take everything you need around with you. I’ve never really gotten into this practice and our apartment isn’t actually big enough for it to be a real issue. Worth considering though.

Products to Have Handy:
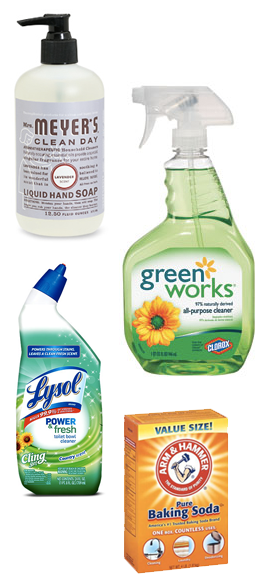
- Liquid hand soap: No one enjoys picking up a slippery, scummy bar of soap. 
  Also, consider avoiding antibacterial; warm water and suds will do the trick!
- All-purpose cleaner: Meyers, Clorox GreenWorks, or homemade all work well.
- Disinfectant wipes: I love these and affordable, generic ones use the same 
  formulas as the big names.
- Furniture cleaner: Our surfaces are mostly older or unfinished and seem 
  unfazed by aerosols like Pledge, though this isn’t recommended for quality 
  wood. Murphy’s Oil is a good option as is mayonnaise.
- Glass cleaner: Whether store brand or homemade, it’s a good one to have.
- Liquid dish soap: We do a lot of dishes—Meyers and Seventh Gen are my top 
  picks. (If you have a dishwasher, add detergent for that to your list.)
- Toilet bowl cleaner: I use Lysol gel but read that denture tablets work too.
- Laundry detergent & softener: I prefer liquid for bothdryer sheets leave a 
  residue and make materials less absorbent over time. I also try to use 
  unscented detergent paired with a lightly scented softener so our clothes aren’t 
  double-dosed in scents.
- Bleach: This powerful cleaner/disinfectant is always helpful to keep on hand. 
  Note: Never, ever, mix bleach with any other chemical or cleaner, ever. 
  (Though this is mostly common knowledge, it bears repeating.)
- Baking soda: Cheap & one of the most versatile cleaners around.
*Note: Be sure to label all cleaning supplies if not clearly marked on package.*


Tools You’ll Need:
- Broom & dustpan / vacuum: I also recommend a handheld vacuum if you have the budget for it—we got a 
  DustBuster for our wedding and has been used weekly since.
- Mop & bucket/Swiffer: Though Swiffer pads can be pricey, these days a wet mop system really can replace a 
  mop & bucket if you’re inclined to do so.
- Toilet brush & holder / shower squeegee (a new challenge for me with glass shower doors)
- Magic Eraser: I’m a recent convert to this little tool, but it totally worked!
- Dusters: I like disposable ones for quick jobs and spare rags for heavier cleaning.

See, not too bad! Now that you have the “how,” let’s discuss the “when.”


During my childhood, there was virtually no cleaning during the week and by the end of breakfast on Saturday, we’d be saying our prayers to not hear mom’s resigned voice chime, “Guess it’s time to get cleaning, huh girls?Ugh!
I dreaded Saturdays for that reason! Which, I supposed, is why I now try to just do a little cleaning each day so duties don’t roll over and pile up onto the weekend. I prefer spending the weekends doing fun stuff, don’t you?

Many people designate specific days for each task. Tuesdays: groceries, Wednesdays: dusting, etc. Though there are many cleaning schedules available online in that format, I have a hard time always getting the same task done on the same day each week. 

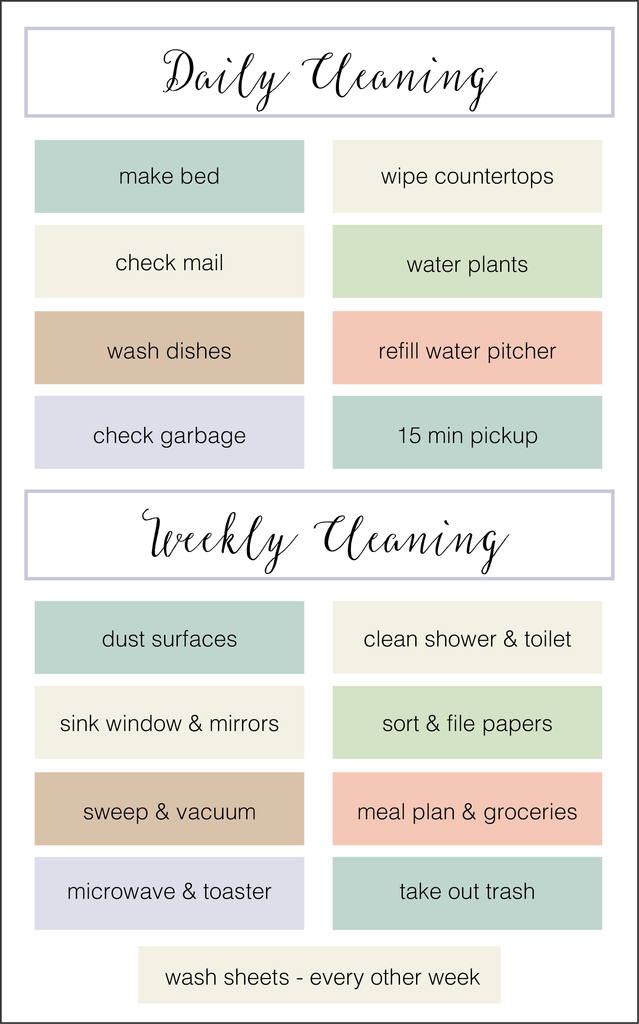
Instead, I have three lists: Daily, Weekly, AnnualI keep the Daily & Weekly tasks on the same sheet, which is laminated & on our fridge. Daily tasks get looked at and mentally checked off each day; Weekly ones get crossed off with a dry-erase marker as they are done, whichever day that may be. 
If this system sounds like it would work for you, snag the free printables below:

Daily & Weekly Cleaning Tasks (with suggestions)

As you can see, I keep the daily list as short as possible. Overview tasks help to keep everything pulled together no matter how busy the day is. I struggle to make the bed every day, but our “15 min pickup” is usually less than 5.

The only list item I don’t have spelled out is laundry. I do laundry once a week (remember, we’re just a family of two). We have two laundry baskets in our closet so we keep it sorted throughout the week, which saves time. I also recommend only doing full loads and doing them back-to-backthis saves time, labor, and energy as the heat in the dryer will cut back on drying times for subsequent loads.

Whether you’re a task-per-day or more flexible type, good music is essential!

There you have it, the tools to get the job done and a solid plan of action. Now buckle your seatbelts because next week, I’ll be putting up four posts in a row looking at cleaning each major area of the home. Get excited!

For some great quick cleaning tips, check out this post on Speed Cleaning over at Living Well Spending Less. Another helpful look at cleaning schedules is available via Apartment Therapy here: The House That Cleans Itself.


This post is part of the Modern Simple Homemaking series.
To learn more about this series and see other posts, click the button above.