12.21.2014

knockout christmas cookies


Okay friends...I'm going to level with you: these are by far the most addictive Christmas cookies I've ever had. They are a bit tedious to make so I haven't ventured to do so for a several years, but Strider's family Christmas reunion was cause enough for me to brush off the recipe. After watching them disappear in a flash, I knew they must be shared. They are delicious and pretty enough to always dazzle at parties. Recipe is courtesy of a friend's mom (thanks, Mrs. S!Without further ado, I give you...

Zebra Cookies or (chocolate-filled cream cheese rugelach crescents, to be fancy about it)
Each batch makes around 24 cookies.
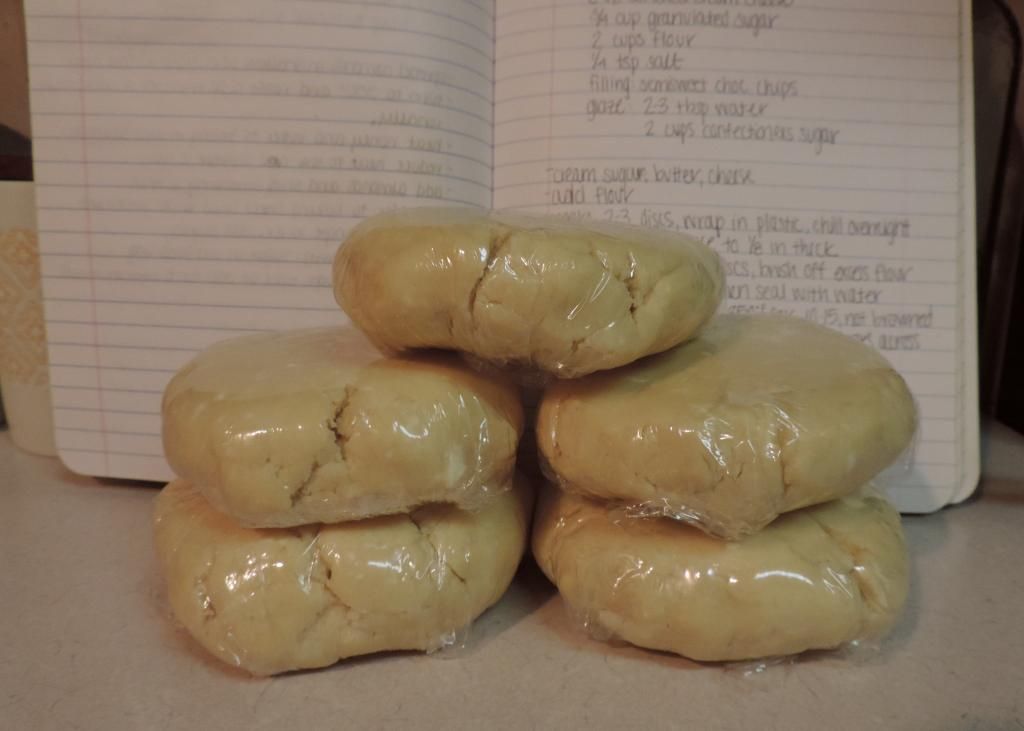
And heads up, the dough needs to be refrigerated overnight so plan ahead at least 2-3 days if baking for an event.

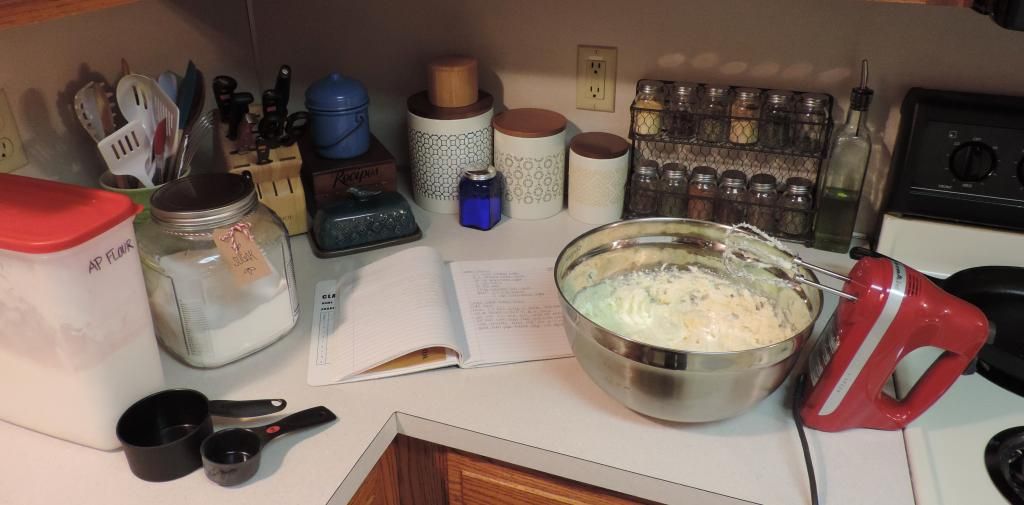
- 1.5 sticks softened unsalted butter
- 8 oz softened cream cheese
- 3/4 cup white sugar
- 2 cups all purpose flour
- 1/4 tsp salt
- 12 oz bag semi-sweet mini chocolate chips
- 2-3 Tbsp water
- 2 cups powdered sugar
- 2 cups semi-sweet chocolate chips (regular size)

First, gather all your ingredients and make sure the butter and cream cheese are close to room temperature. Cream together the butter, sugar, and cream cheese. Add flour and mix until well combined but not overworked. 
Divide the batter into 2-3 sections and flatten into discs. Wrap in plastic wrap tightly and refrigerate overnight. 
(A double batch makes around 5 discs, as below.)
After talking someone in to helping you, roll the dough out on a floured surface, working one disc at a time, until around 1/8" thick. Using a round cookie cutter about 3.5"-4" across (or the rim of a plastic cup if you don't have a cutter), separate as many rounds as possible. Brush off any excess flour. 

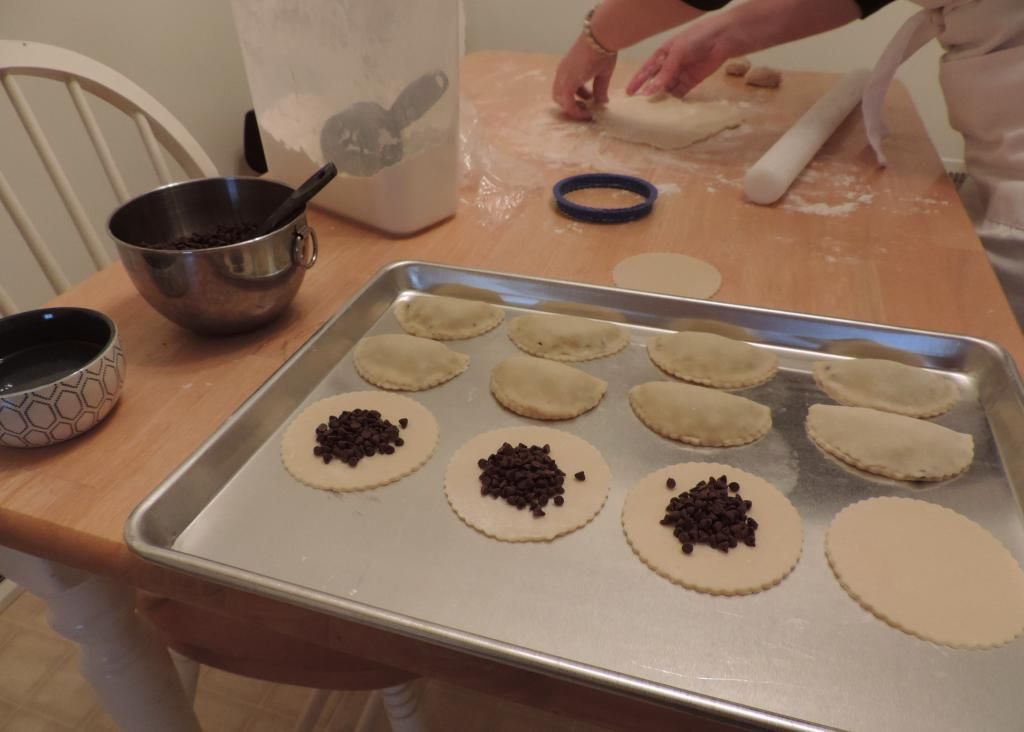
While this is being done, the second person should fill each circle with slightly less than 1 Tbsp of the mini chips. Using a small dish of water, lightly wet one half of each circle, fold over, and press gently to close. (Hand modeling by and a massive thank you to Strider's mom for assisting!)

The trick here is to keep the dough cold until right before you need it, hence just working one disc at a time. Once the cream cheese and butter warm up, it becomes too sticky and absorbs too much of the flour on the table. It's hard to work with when very cold, but that is better than the alternative.
Once each pan is filled with crescents, bake at 350F for 10 minutes. The tops should feel slightly set but not actually be allowed to brown. Once they start browning, the dough gets hard very quickly. They may look slightly undercooked, but they are better that way than when overcooked. (Plus, no eggs = no undercooking concerns.)

Once cooled, mix the powdered sugar and water into a semi-thick glaze. The easiest way to coat each cookie is to just hold it upside-down and dunk the top into the bowl of glaze. Then set each cookie right-side up on your cooking rack with a pan underneath to catch glaze drippings (of which there will be lots!).
Once the glaze has hardened (usually an hour or two), melt the 2 cups of chocolate chips at 30 sec intervals in the microwave. Using a pastry bag and round tip (I prefer a Wilton #5) or a plastic bag with the corner snipped off, pipe a zig-zag of chocolate on each cookie top. Let them cool long enough for the squiggles to harden before storing.
**NOTE: though good on day one, these cookies are best after resting overnight or longer**

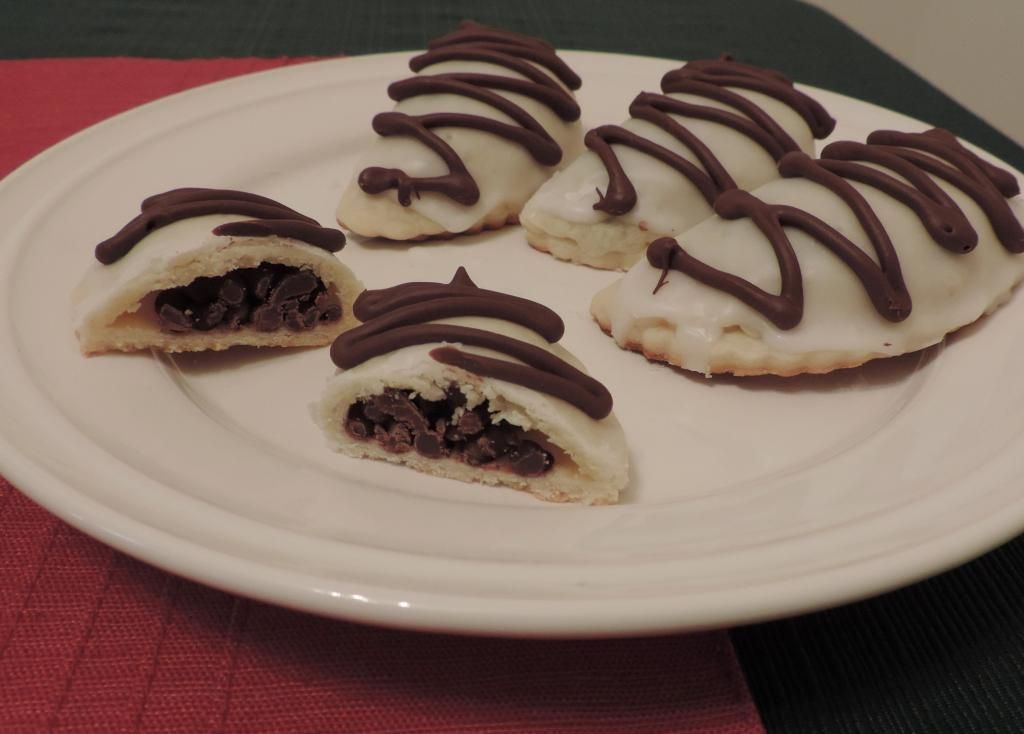
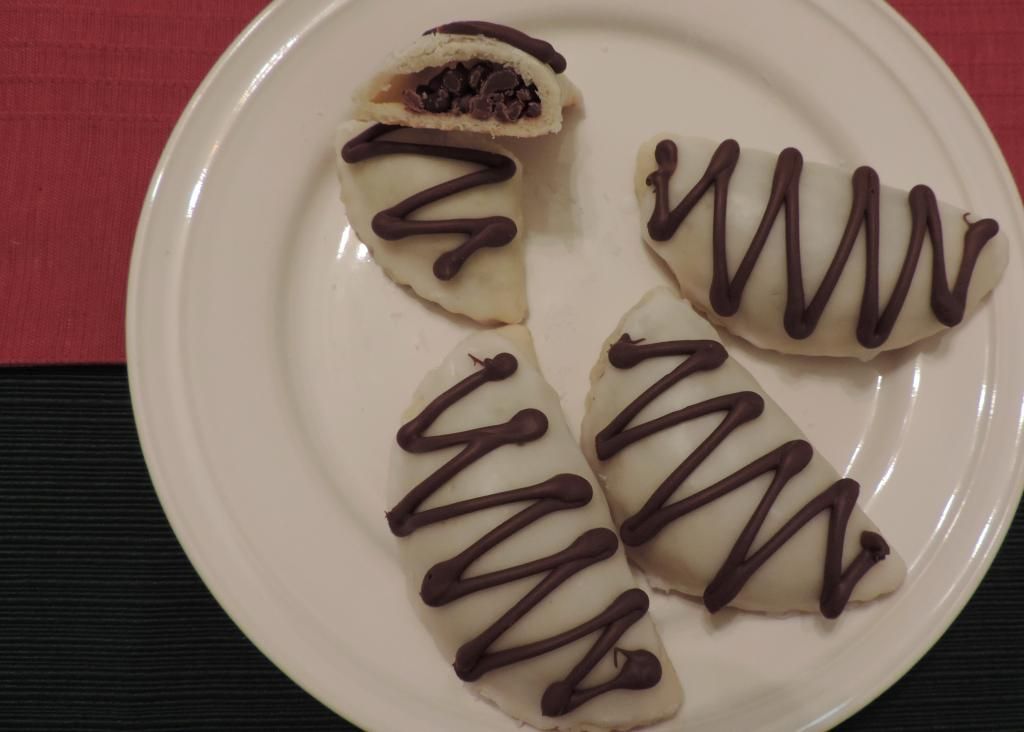
Beautiful if I do say so myself. And part of their magic is that the chips inside don't melt completely. Every time I make them people marvel at how they can still see the tiny chips. I've tried lots of varieties (Nutella-filled among them) but always seem to return to the original. Unfortunately, ours are already long gone and now the photos are making me hungry all over again.

Happy baking!!

12.09.2014

home holiday happenings

Hi friends! Between work and cooking, I've been sewing and reading furiously of late. Plus, lots and lots of Christmas decorating and movie-watching. I absolutely love how festive and fun home feels this time of year. (Meanwhile, Strider is being a very good sport!) In lieu of having you over for cocoa, I thought I'd just share some snapshots of our seasonal fun-tivities!
Strider is much more trustworthy with a saw!
Our first-ever cut-it-yourself tree!
Bunting for living room wall - made with twine, scrapbook paper,
index cards, and a little acrylic-paint-time for the letters.
Remember that DIY crate entertainment center...now doubling as a nativity "stable".
No fireplace but still "hung with care" on our bookcase!
Fun story: My family has a longstanding tradition of a mistletoad instead of mistletoe.
Though they don't make 
my mom's version anymore (circa 1988), I managed to snag
this cutie at Hallmark then deck him out with a 
modified wine bottle santa suit
from the dollar store. Silly Christmas traditions for the win!
Oliver the Christmas Owl - our newest (and cutest) addition!
Candy cane pillowcases (because bedroom holiday decorations are scarce)
and a small Santa pillow cover just for fun. Have I mentioned that
I love making pillowcases?! So quick and fun!
Our little dining table all decked out! Tablecloth - Salvation Army $3.
Centerpiece vase - Walmart $3. Napkins - Pier1 via wedding gift card $0.
Glassware....
It may not be Lenox or Spode but I love it's antique charm!
Small glasses were found at Habitat Restore in NC, $3 for 6;
goblets were found at Salvation Army in PA, $2 for 4.
AND they totally match! We are so fancy!

Now back to baking and singing carols!


So, what's your favorite/silliest family holiday tradition? I'd love to know! 


11.16.2014

homemaking survey

Hey there blog friends!

Sorry it's been a while...posting is tricky since we still don't have internet at the new apt. 
The comeback will be awesome though, I promise.

In the meantime, please help me out and take this quick survey about homemaking. It should take 5 minutes or less and I really appreciate your feedback.

http://kwiksurveys.com/s.asp?sid=05h5913m7jyaovt452378

Thanks!!!


11.02.2014

Winter Quilt Project

Driving along our road, it's now easy to see the mountain range framed by leafless trees. The grass is still green and vibrant colors dance across the hills. Along with this fantastic view, however, comes our first day in the forties and a chilly wind echoing Halloween-ish noises across the windows. Good thing I'm staying busy inside!

After an inspiring trip to Joanne's a couple weeks ago, I decided to finally embark on my second full-sized quilt. I've done individual blocks and some smaller projects during the last few years, but nothing substantial since college. My first quilt was a simple, brightly colored patchwork piece that required no pattern or really any substantial skill. It was a decent first project and though we still use it, I'm excited about the challenge of seeing a real quilt through. Hopefully it will be a good winter project to keep me occupied during the blustery days ahead as well as a snuggly victory to enjoy come Spring.

Progress so far...
- 30 miscellaneous fabrics (most from my existing stash)
- 1100 squares total, 520 still to be cut
- piecing, borders, backing, binding, and of course, quilting all yet to do

Expecting craft-remorse to inevitably set in soon.


Stay warm, friends!

10.12.2014

Applepalooza 2014

In what I hope will be the first of many days spent canning with Strider's mom, I have affectionately named this past Friday the 2014 Applepalooza! Though it was no big deal to her, it was a truly epic experience for this canning newbie. I've been excited to learn how to can for a while, but as I pointed out to her, it isn't the kind of thing you ever really get the hang of by just reading about it. 

To start off, we gathered our materials and washed our combined bushel of apples. That's right, a "bushel of apples", as in not a math word problem, the actual measurement of "a bushel" (which may I add, I definitely thought was only used on elementary school math worksheets, not in real life). Purchased from a nearby orchard, our bounty cost a total of $16.

With a plan to gift some "apple pies in a jar", I set to work cooking up enough filling for six pies using this recipe from last fall: Caramel-Chai Apple Pie. Yummm! Meanwhile Strider's mom used a tabletop apple peeler/slicer/corer contraption which we both agreed was one of the handiest fall baking inventions ever.
Working in two batches, we combined 12 apples with a pot full of filling in a large steel bowl. Then, using a canning funnel and a measuring cup for scooping, we filled the jars until just below the bottom rim line.
After all the jars were filled, we cleaned up the rims, secured the jar rings, and started heating up the water in the canning pot. All six jars used up a little over half of one half-bushel of apples...also known as one peck (also not just an obsolete term utilized by sneaky math teachers - who knew!)! 
Once the water was boiling, we gently lowered all six jars into the rack. Upon reflection, we realized that we could have probably fit a seventh jar in the center but that six had worked out better for the filling recipe conversion math.
After 30 minutes at a rolling boil, we used canning tongs to very carefully lift each jar out of the bath and set them on the counter. Then began the wait...the agonizing minutes of anticipation and eagerness to hear six "POP"s that would chime the successful sealing of each jar. 
As we waited, we set to work on Apple Project #2: Homemade Applesauce!

After spending a good while chunking the remaining apples into pieces (with cores and skins included), we filled a large pot with apple chunks and just a bit of water and set it over med-high heat. Once the entire pot of apples had cooked into mush, Strider's mom showed me how to use the hand-crank food mill to separate the applesauce from the cores and skins destined for the compost pile.
We worked for a while with success. But it all came to a grinding halt (excuse the pun) when the (admittedly a bit outdated) food mill conceded defeat to the apples and broke completely in two. With two huge pots of apples still to go and a giant mess in the kitchen, we switched the oven off and drove to the restaurant supply store that happens to be less than 5 minutes from the house. (An incredible blessing in location!) After purchasing a newer style mill, we made fast work of the rest of the apples.
You can see from the picture above how the mill separates the pulp from the sauce as you turn the crank. Interestingly enough, the apple sauce in this picture looks much redder than the other as there were more red apples cooked down in this pot. Working in smaller batches, we combined all the applesauce into a large stock pot so all the different kinds of apples' sauce got mixed together.
Using old whipped topping containers, we separated all the applesauce out into freeze-able amounts. Though we did add a little sugar to the sauce (probably 1 cup for the whole stockpot so still loads less than store-bought), it was actually sweet enough that you don't necessarily have to add anything. When it was all said and done...
...we ended up with 17 containers of applesauce! I added a quick swirl of cinnamon to each container then we arranged them all into the freezer. Strider's mom assured me that it stays delicious for a long time when frozen this fresh and that this amount usually lasts them all year. After numerous taste tests, I can assure you that it definitely won't last a year in our freezer, but it's easily a much more nutritious and cost-effective method than the snack cups Strider and I usually enjoy at home.

Don't think we forgot about those jars either. Sadly, only four out of six sealed properly. One, we believed we over-filled in our eagerness, and another had an issue with the lid -- both great lessons to learn from for next time. Plus, I used the contents from one unsealed jar to make a test pie Friday night, and the other got transferred to a plastic container and frozen for another fall baking day...definitely counting it still as a win!

Add some homemade tags with baking instructions on the back and voila! nifty gifts to send home when my sister and her husband come to visit in a couple weeks. Homemade apple pie canned with local PA apples less than 24 hours from the orchard...at about $4 per jar to make, this was an easy and extremely fun gift to put together! Canning the pies only took around an hour of hands-on time as well so if you were feeling particularly industrious, you could make many more than this in just one afternoon.
Canning is a whole new world to me but with lots of farm markets nearby and a wealth of canning knowledge in Strider's mom and Grammy, I look forward to seeing what our pantry looks like this time next fall!


9.28.2014

fall crafts & not-so-fall crafts

As apartment decorating winds down and we settle into our new routines, the oncoming chill in the air is inspiring fall scented everything and lots of crafts. Thanks to some Joanne's coupons from a sweet friend, I picked up a few pieces of autumnal fabric with a quick sewing project formulating. After a couple hours of work, I have a simple seasonal apron to hang in the kitchen, just waiting for a pumpkin roll to be made. (Tutorial to be posted eventually when I'm feeling a bit more inspired.)

In another stroke of autumn excitement, I snagged a grapevine wreath from Hobby Lobby for $5 as well as a couple cheap pieces of leaves/flowers/etc. Add a little hot glue and leftover ribbon for a fast and inexpensive DIY wreath.

Although not strictly fall-related, here's a snapshot of the latest project (completed today). For just the cost of the scrapbook background paper, I used extra white photo frames to showcase some treasured family history. I mounted each recipe card on plain white cardstock then taped them to a piece of vintage-style striped paper. After hot gluing two pieces of vintage cutlery leftover from another project, I called it done. Simple and heartfelt.
(Note: photo shot at a weird angle because of a background glare issue)

Four amazing chefs represented: my aunt Terri, my "Mammaw",
my dad, and Strider's paternal grandmother Anna

Last but not least, here is the reveal on the crates project I hinted about last week...our very own convertible entertainment center. Inexpensive, rustic, and definitely not from Ikea. 
I purchased the crates at a local farm market here for less than $7 each. They are extremely sturdy and after a little sanding and wood stain, they were the perfect addition to our living room. Bonus- when we get a bigger TV (Strider is dying to ditch the 19"), we can just rearrange the crates. No fuss, no big console commitment. I love everything about this project...okay, excluding the 6 spiders I battled with the dust-buster while doing an initial cleaning.

More later, feeling a bit flat at the moment. Positive note, I started a fantastic new book today and will look forward to sharing that soon as well!

9.17.2014

Toto, we're home. Home!

It's official -- we're now residents of Pennsylvania, with our very own apartment and utility bill to prove it! 
The "before" of our new front door. We haven't quite figured out what
we want to do with it yet, but very exciting nonetheless!
And with two days off last week, I managed to get every box emptied, flattened, and out the door so actually feels like home. We're still working on the internet connectivity so posting/engaging online is tricky at the moment, but I do have a few fun apartment crafts to show off:
DIY key rack right inside the front door. All materials from Hobby Lobby. I stained/painted/sanded the wood plaque then hot glued the cross and knobs to the front.

In celebration of my first real pantry ever (at our last place we used a converted coat closet), I transferred most of our dry goods to various sized glass jars and made kraft paper tags for everything. They don't photograph well inside the pantry but make me surprisingly happy to see all in a line. 

Some homemade bathroom wall art using a spare frame we already had. Total cost = 25 cents for the paper...works for me! Lettering was done using this method.

 And for a super sneak peek...here's our craft room with a mysterious wooden crates project underway.

I promise I'll have more soon, but for now...I'm off to cook dinner and keep crafting! (Plus, watching gobs of Gilmore Girls because I finally succeeded in getting Strider hooked!!)


8.29.2014

tractors and taters

We made it! The truck has been returned and a mountain of our stuff now occupies half our parents' garage. We spent all week sorting out employment and housing stuff, but we're almost finished with those things as well. We found an amazing apartment and after some great recommendations on our behalf (thank you friends!), we got it! The landlord is repainting so we can't actually move in for another two weeks, but at least there is a timeline there with an incredible new home for us at the end. Incredible as in furnished washer/dryer and central AC kind of incredible...pinch me! 
In the meantime, we've been trying to be helpful squatters. This morning, Strider's mom let me help make and can homemade salsa. My first actually canning experience - totally awesome and definitely taking pictures next time. Then, we headed over to help our grandparents dig up their potatoes. New to me, it was surprisingly fun and quick.
Pappy on the tractor
Strider's Uncle manned the plow...see those yellow "rocks"...potatoes just rolling right out of the dirt!
Once the rows are plowed, hands get dirty very quickly.
The buckets were filling up fast!
No middle man needed. Plus, Strider got to wear his snazzy work boots!
Apparently pretty good haul for just five rows...looks like tons to this first-timer!
Grammy and Strider's mom handled the last of the lima beans while we finished up the 'taters.
Load them onto the truck...
...and drive 'em around to "the cave" where they can be stored in the cool and dark.
After we were done, we sat on the porch and shelled the peas. The hard work was rewarded with ice cream sandwiches and lemonade. Plus a sneak peek at Grammy's freshly canned peaches. Yum! Plus, check out this view -- imagine a blanket and a good book under that tree, huh!
Work starts Monday but it's been a very fun week of adventures, exploring, getting lost, and realizing just how small you feel in a new place. But also how exciting the unknown can be! Looking forward to so much more to come.