3.30.2015

Giveaway Winner


CONGRATULATIONS 
to courtb2, the winner of the first giveaway in the 

A big thank you to everyone reading so far; 
make sure to stop by at the end of this week as we start 
part two in the series: Establishing Order.


See you this weekend!


3.27.2015

MSH series: Giveaway #1

Hey there, friends! 
Today launches the first giveaway in the Modern Simple Homemaking series!


In case you've missed the first few weeks, here's a recap of posts:


In addition, here are some of my favorite home-style resources to 
get a more in-depth look at creating a beautiful home:


Now...on to the good stuff! Today's giveaway includes:
img source
A (slightly-loved) copy of The Nesting Place by Myquillyn Smitha handy 
Shopping List notepad, and a $10 Bed Bath & Beyond gift card!


Just leave a comment below to be entered for your chance to win.

The winner will be randomly selected and announced on Monday.
Thanks for reading and make sure to come back next week to learn how 
to easily create systems of order in your home!

3-30-15 Note: This giveaway is now closed but there will 
be more to come so don't miss out on the next one!

This post is part of the Modern Simple Homemaking series.
To learn more about this series and see other posts, click the button above.


3.20.2015

Making Home Yours

(OR Cultivating Creative Home Decor)


Now that you have a sense of your domestic style, it's time to start definitively reflecting it in your own home.
Some helpful tips to consider before jumping in:
- Focus on one room at a time.
- Define the purpose of the room regardless of it's intended function: (A friend recently turned a small 
   sunroom into a homeschool zone for her kiddos; not its original purpose but better to serve their needs.)
- Get to bare bones: Clear out as much as possible so you can start with a blank canvas.

Time to get inspired! And if you're like me, there's nothing to spark home decor inspiration like a beautiful photo of someone else's living space. A perfect example for me is this stunning dining area below:

Source
Though the actual style of the space seems fairly simple, when you consider each part, there are suddenly a lot of components that make up the whole. It's THIS moment of dissection that makes many home-self-stylists feel overwhelmed. We see something we love but a quick consideration of the budget and experts they may have had at their fingertips, suddenly, even trying begins to feel futile. But it isn't as impossible as it may seem!

First, find a few indulgent sources of inspiration that you know are a bit far-fetched. Realize that these are just jumping-off points and not the actual end-goal. Next, print off copies of your favorites and circle a few of the elements that you love the most.
Now that you've identified your favorite components, consider how realistic they might be to incorporate into your home or think up some alternatives if they aren't. My usual go-to is to first consider a new paint color for the space, which is easy and relatively inexpensive, but also not an option for our apartment. So...on to do-able items:

1. Lavender (& lots of plants): I don't have enough space for a plant to reserve a chair unto itself. And frankly, I'm 
    not that great at keeping plants alive these days.
2. Rustic-industrial light fixtures: Very cute but not possible for me - our dining room has a depressing brass 
    light fixture that carries a definite permanence of "renters aren't allowed to change everything".
3. Hutch & vintage kitchenware: LOVE the blue hutch but I have neither the space nor the budget for a large 
    acquisition. I've been looking for something similar for a while, but it may not be in the cards for this apartment. 
    Cute, vintage-style accents, however, are definitely doable!
4. Colored glass bottles & rough wood frames: I have a smattering of bottles, crocks, and vintage-style wooden
    frames already. A great opportunity to Shop In Your Own Home.

Start with what you may already have around the house and tackle each realistic element you want to include. Take time getting creative with how you can make those happen—I may not be able to achieve the wire lighting, but maybe a wire basket or accent elsewhere will incorporate the same look. 

Sources for decorative elements will change based on your personal style but here are some tried-and-true sources worth everyone's time:
- HomeGoods/Dept Stores: A little pricier than other options, but you can find great items on clearance.
- Antique stores: Many people are put off by feeling that they don't know what is of value, but I firmly believe that 
   it isn't collector value but personal value that matters. If I like it, that's good enough for me! 
- Thrift stores: You may not find a treasure every visit, but keep a watchful eye as merchandise moves in and out 
   quickly. Have a few to frequent every few weeks just to browse new items.
- Yard sales: It's work to get up early and drive around during the yard sale season but there can be a great payoff 
   if you're determined and don't give up easily. Take a friend to make the digging more fun.
- Discount stores: WalMart, BigLots, and dollar stores are great sources for items that need just a little paint or 
   embellishing (ex: a bit of hot glue and lace turned a cheap lampshade into a unique living room addition!)
- Craigslist/Community Facebook: Be wary when exploring posts here and make sure to confirm the condition of 
   items before agreeing to purchase HOWEVER don't be dissuaded - there are some incredible finds to be 
   discovered here! (Our awesome living room furniture was just $100!) Don't forget to take a friend for pickups!
- Roadside: For the truly adventurous, keep your eyes out for curbside haul-away items. My rules: nothing 
   upholstered or if weather has been bad. People often discard minimal-repair items to avoid hauling them away.

Now back to our dining room style re-imagining. Here is our dining area...exactly 7 square feet with a brass light fixture that can't be changed out. The Before: (complete with $25 yard sale table/chair set that has a refinishing project in its future come spring)
And after a bit of creative hunting at home and in a few thrift & antique stores:

1. Lavender: Some half-off artificial sprigs from Hobby Lobby in a spare vase originally snagged for $4 in the 
    clearance section of a Hancock Fabrics.
2. Rustic-industrial light fixtures: Though the light fixture is non-optional, I brought in the wire lighting look with 
    a new candle holder from Lucky Girl Vintage ($10).
3. Hutch & vintage kitchenware: No room for a hutch but vintage accents are doable with an antique teapot ($15 
    at a local market), old-school hand mixer, and red tin (which doubles to hide chalk & eraser for our frame above).
4. Colored glass bottles & rough wood frames: all scrounged from around our house; the frames were originally 
    white but I gave them a spruce up with a $2 sample jar of paint from Lowe's

So there you have it! Some great (and maybe surprising) sources for decorative items plus a new plan of attack for successfully beginning a re-style your space, one room at a time.

Also remember that lighting, plants, candles, pillows, and other small accents, while clutter-y in excess, in moderation, are a great way to introduce color and style in any room.

How about some free resources and a gift card to get you started?
Check back next week for the first Modern Simple Homemaking series giveaway!


This post is part of the Modern Simple Homemaking series.
To learn more about this series and see other posts, click the button above.


3.16.2015

Finding Your Domestic Style

(OR Why Decor Magazines Are Big Fat Liars)

In the last post, I talked about retaining your sanity while moving to a new home. So whether you’re starting from scratch in a new place or just looking around your well-settled home with a creatively critical eye, now comes the fun part: Making It Beautiful! And it's just a matter of where to start...

It takes no time at all to find gobs of expert decorating advice, tips, and quizzes. However, I’ve found that the trouble with those sources is that everything is often expensive and unrealistic. Yes, the rooms they are photographing are admittedly staged, but answer honestly—would you really want to spend time in those spaces even with a stray pair of shoes or bit of clutter added back in? My answer is usually no. 

Maybe my dislike of such high-brow, well-manicured living is rooted in my simple childhood. Or maybe...normal, average people just like comfortable spaces. And maybe, the idea of furniture you aren’t supposed to sit on is just as ludicrous to others as it is to me. Maybe...the magazines are just big fat liars.
So where does this leave the average homemaker wanting to create a unique, comfortable, and stylish home environment on a limited budget and with finite resources?
Well, here are two great ways to start defining your own home style:


Method #1: Feelings Over Themes
Though online quizzes may point you in the right direction, almost no one really fits in to the ludicrous decorative categories dreamed up by the “experts.” As with most things, likes and dislikes are usually made on a case-by-case basis, so shouldn’t we evaluate our style the same way?

Classical, Contemporary, Farmhouse, Cottage, English Cottage, French Country, Transitional, 
Country Glam, Primitive, Colonial, Art Deco, Rustic, Bohemian, Mediterranean, Coastal
What in the world do any of those have to do with me?!   

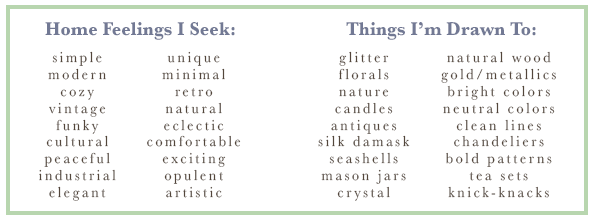
Instead of an abstract theme, make a list of words that describe how you want your home to feel and things you are typically drawn to. Try starting with some of these:

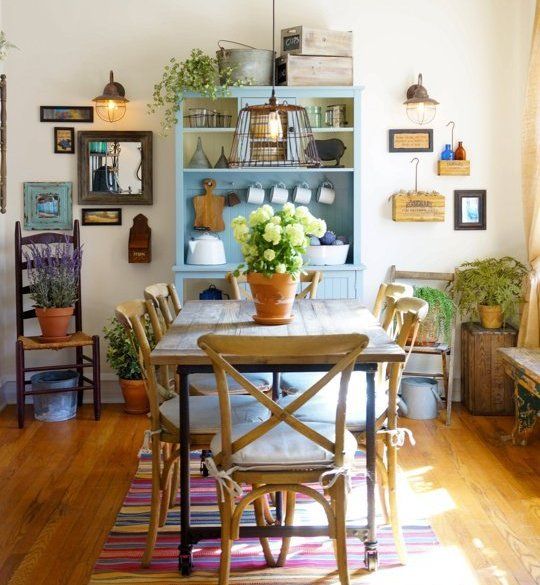
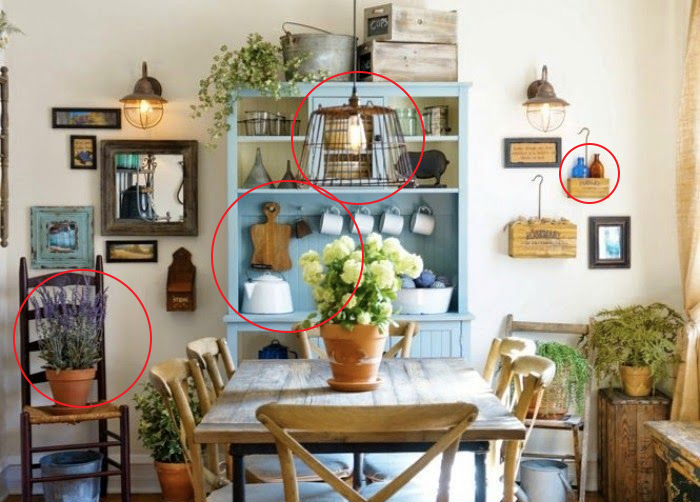
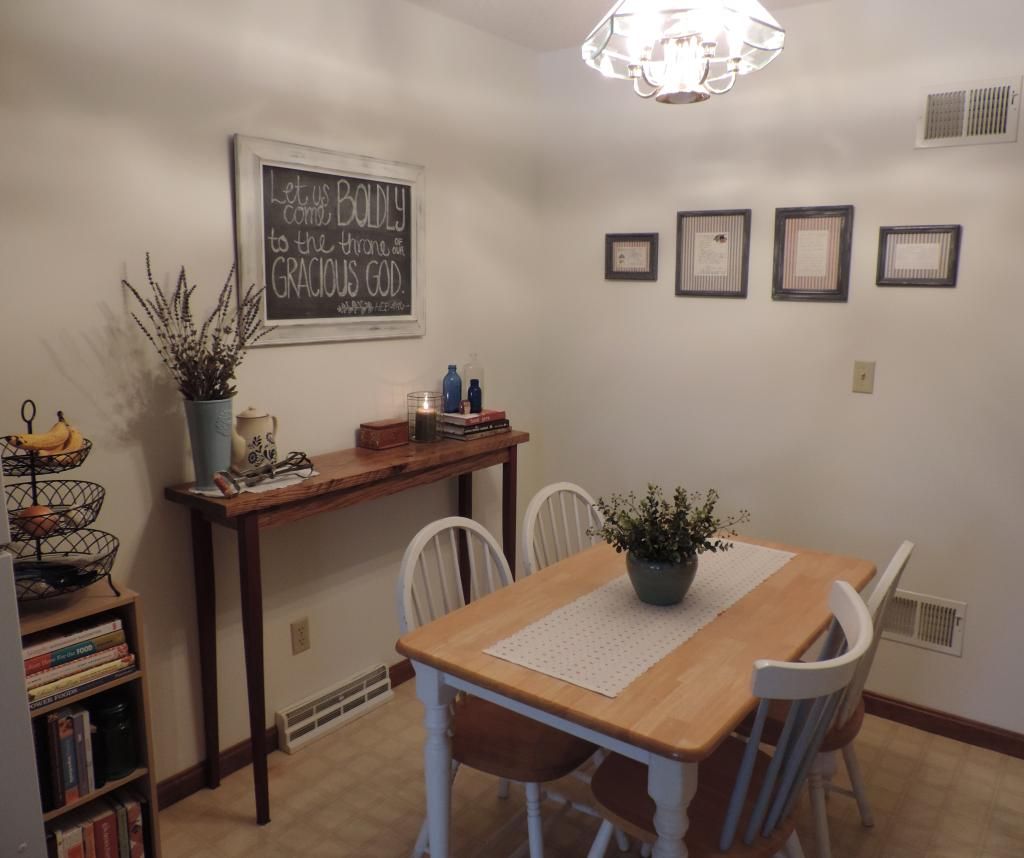
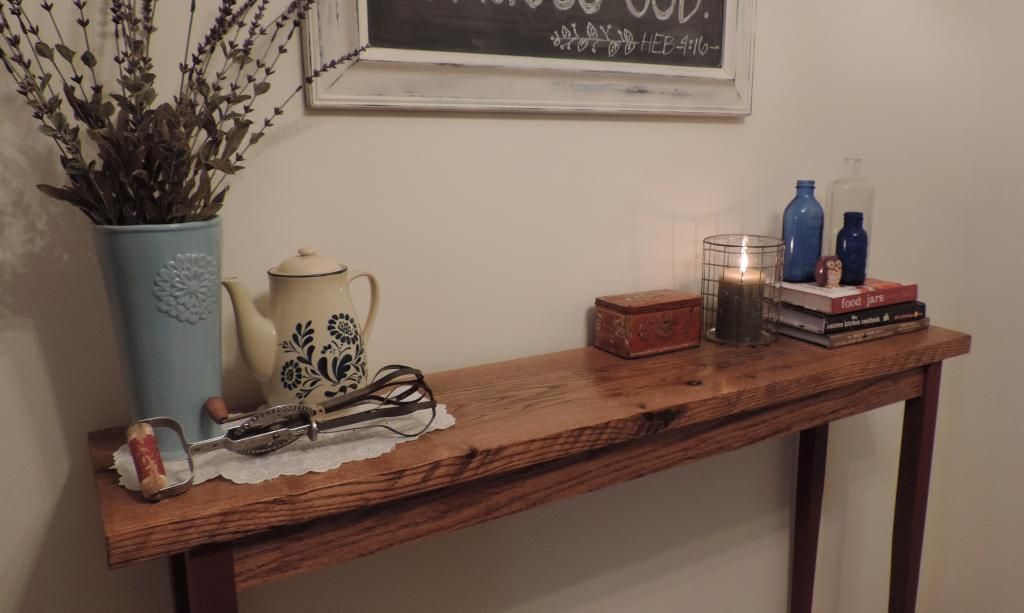
Now that you have a list of keywords, use those to define your style. Either go old-school with scissors and magazines or hop on Pinterest (it’s what it was made for!). Make a new inspiration board and browse around a bit. Look in the Home Decor section, yes, but also try searching some of your keywords and adding random objects as well. As an example, check out my Home Style Inspiration board. After a while, look at the whole collection of images and you’ll probably see a strong style of your own coming through. 
Remember: It doesn’t have to be expert-defined to be beautiful!

Several online quizzes have suggested that “Farmhouse Glam” is right for me...and I can tell you right now that nothing in my life is “glam”. And how my favorite dog is supposed to contribute to that analysis is beyond me!


Method #2: Take A Cue From Hollywood
Though we’ve already established that the controlled environments in decor magazines are mostly lies, in a strange a twist, Hollywood can be a good measure of truth. Though I’ve found zero mention of this theory on home decor sites, I think movie sets are a great way to examine home styles. Set designers and prop departments spend loads of money, time, and talent to create believableintentionally imperfect environments for their characters. Have you ever been watching a movie and said to yourself, “Wow, I love that kitchen!” or “How cute is that bedspread?” I can’t be the only one! 

Think through some of you favorite movies and see if you can recall a set that particularly stuck out to you or a really memorable house. Jot down what you liked about it, or better yet, Google it and see if you can find a screenshot. Or next time you watch that movie, snap a picture of something you like on your phone. It sounds crazy but it’s worked for me!


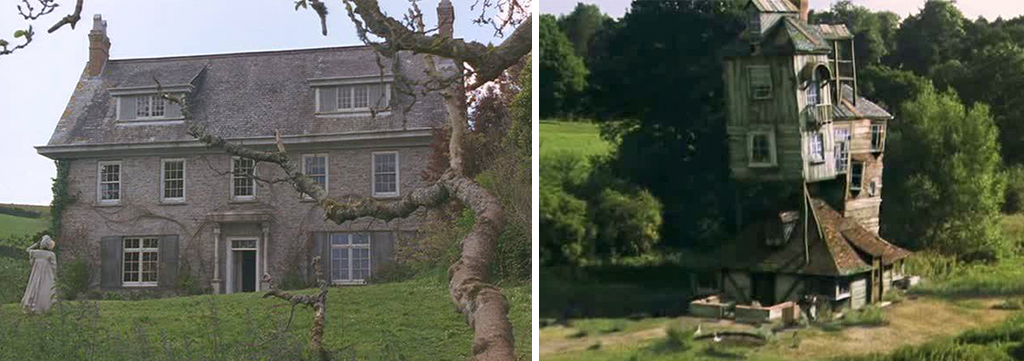
So, based on word lists, my inspiration board, and favorite Hollywood homes, it seems my ideal style is somewhere between Sense & Sensibility’s Barton Cottage and Harry Potter’s The Burrow. Which I guess makes my personal style category something like “Farmhouse-Cottage-Eclectic-Magic-Fictional.” Haha!


One last note: Don’t forget to consider others’ style as well when your home is shared. Everyone appreciates feeling at home in their home even if they claim they "don't care". **cough cough, husbands**


Now...how can you build that style in your home without a decorator and on a shoestring budget? 
Find out in my next post!


This post is part of the Modern Simple Homemaking series.
To learn more about this series and see other posts, click the button above.


3.06.2015

Moving Day- From One Home to the Next

(OR: 18 Tips To Avoid Packing Away Your Sanity)


Back in September, Strider and I successfully completed our first out-of-state move: 350 miles, a lot of cardboard, and exactly 2 weeks in which to make it all happen. When faced with this exciting challenge, naturally I approached it with a characteristic lets-get-planning mentality. Though many friends and well-meaning acquaintances groaned when sharing their own tales of moving horror, we found it much less gruesome than most. So if you're looking at making a similar transition, here are 18 tips we found extremely helpful!

First of all, if you're like us and live in an small to medium sized apartment with no children, take heart in knowing that the moving process is already infinitely less complicated for you than many others! Which is all the better for getting a good system refined before larger, more complicated moves later on. 


1. Declutter First: 
Before/as you start packing things up, weed out unnecessary items that can be outsourced instead of hauled along. If the idea of a last-minute yard sale is nightmarish to you (like me), opt instead for gifting to local friends or donating to the many charities inevitably nearby - just make sure to save donation slips for end-of-year write-offs.

2. Scavenge, Don't Buy: 
For boxes: try Craigslist, community Facebook pages or, my personal favorite, your local liquor store. Though we aren't store patrons, they are usually happy to off-load tons of boxes -- most are relatively small but extremely sturdy and great for packing items like books that become difficult to carry in bulk. For padding: use towels, extra clothing, and spare blankets. Only purchase bubble wrap for items worth it like dishes and delicate glassware. Even with these, line the box with a towel so the bubble wrap is only around each item, not filling box gaps.

3. Get Your List On: 
Though many people recommend color-coding boxes by room or labeling each box with its contents, I found that a little more effort goes a long way. First, pick up a pack of adhesive labels (we used these). Next, either grab a sheet of paper or print off the template version below. Make a numbered list for each room; most rooms are fine with 1-15, except the kitchen, which you should definitely number much higher. Now, write on the labels to make each correspond to a list item, ex: Living Room #4. As you pack, place a numbered label on the box and write a detailed contents list on the sheet. It sounds like extra work, but it really isn't and has a huge payoff in the end! This sheet will be an easy and direct reference point when you start to unpack everything weeks later and it will save you from an even larger mess of opened boxes. Don't forget to make a few "Miscellaneous" labels for items at the end that may not all come from one room or have a specific destination. Once you're finished packing, this list is much easier to reference when looking for individual items than walking through and reading the contents on each box. 


4. Think Russian Dolls: 
Use larger items to hold smaller ones - crock pots can hold spices or small kitchen linens; plastic pitchers are great for holding long utensils like spatulas and wooden spoons. Also try collecting all your trash cans and see if you can fit them together - we managed to get all of ours inside the kitchen trash.
Source
5. X Marks It: 
Instead of multiple rolls of colored tape for each room, use one color (or leftover painter's tape in our case) to make large Xs on your boxes of extra-fragile items. As finished boxes get stacked up, keep these in a separate section for easy identification. (See tip #11)

6. Minimize Spills: 
Control spill-able items such as cooking oils, detergents, and shampoo by placing plastic-wrap under the caps. These can also all be packed together in one box with arrows on the outside to indicate keeping it upright. Even still, I recommend using a large trash bag to line the inside of the box, tying it shut before taping up the box.
Source
7. Set Luggage Aside: 
Use luggage and duffle bags to pack an easy-access bag of clothes and essential toiletries for the first few post-move days. Extra unpacked bags can also be nested together in what we affectionately call "bag-ception."

8. Leave Hang-Ups Alone: 
Use trash bags to bulk pack hanging items. Simply divide hanging clothes into similar categories (ex: Strider's vests/pants, Sarah's dresses) then label the trash bag accordingly before sliding it over the bottom of the hanging items and tying it off at the top. You can usually get around 10-12 hangers per bag and unpacking is a breeze.

9. Utilize Filled Drawers: 
Don't waste time emptying and packing dresser drawer contents. Pull the drawers out (still filled), move the dresser into the truck, replace the drawers, and use stretch-wrap to secure the drawers inside the dresser. Bonus: also use stretch-wrap with silverware trays to keep everything clean and collected.

10. Quick-Grab Home Essentials: 
Don't forget to fill a box or basket with cleaning and unpacking essentials for when you get to your new digs. Include: box cutter, scissors, trash bags, disinfectant wipes, paper towels, toilet paper, paper plates/cups/cutlery, hand soap, etc. Naturally, you'll still need these as you finish packing, but don't forget to set them aside as you go. Here is another brief list of moving essentials during the first few days in your new place.

11. Keep Things Handy: 
Utilize car space for "essentials bags", uber-breakables, and irreplaceable items like photo albums and heirlooms. Keeping these items of out the moving truck entirely means peace of mind along the way. It also means less to go in a truck = using a smaller truck = less $.

12. Unpack with Method: 
When unloading, place boxes in each room where they belong. Unpack one room at a time, using your master packing list to know which boxes must be unpacked first.

13. Bag the Bits: 
Use zip-seal sandwich bags to corral cords and small parts. Label each bag before filling and stow them all together in one box or in a toolbox. This is particularly helpful for curtain rod pieces and electronic mounting hardware.
Source

14. Eat Your Way Out: 
Make a meal plan for your last two weeks in your old place creatively using up as much pantry food as possible. Though the meals may start to look a little interesting in the end, you really can get down to the bare minimum. For too-difficult-to-transport items, ask nearby friends if they'd like to take them off your hands. 

15. Clean Your Way Out: 
Especially for renters, make sure to clean as you go. Getting a full security deposit back will come in handy for your next place. Tip: to get furniture lines out of carpet, place ice cubes on top and leave to melt overnight, vacuum the next day. Once clean, take photos of each room to document any damage/lack thereof. Also photograph your new place before unloading vehicles if renting again.

16. Leave a Trail: 
Make a list of all the places that you'll need to notify of your move, starting with a Change of Address with the post office (with at least two weeks notice). Include: banks, credit card company, employers, doctor's offices/pharmacy, Amazon, mail subscriptions, etc. If you've met the next tenants/new owners of your home, leave a few forwarding address labels for them to use if anything comes through and isn't automatically forwarded.

Better yet, if you have your new address, go ahead & order a set of awesome address labels like these (so cute!):

17. Many Hands: 
Don't be afraid to ask friends and family to help with the move and save yourself the cost of hiring professionals. Just remember to be a team player yourself and offer food or a future favor in return. Important: make sure to have everything packed up before they arrive!

18. Most Importantly - Don't Miss It: 
Enjoy your new adventure! Yes, moving can be a lot of work, but grab a bottle of sparkling cider and toast to all the memories you made in your old place or christen your new home and all the memories soon to be made!


Any other tips to share from experienced nomads? 
Happy Moving!


This post is part of the Modern Simple Homemaking series.
To learn more about this series and see other posts, click the button above.