1.06.2014

framed silhouette DIY

The world's shortest art history lesson: A simple art form dating back to the mid 18th century, silhouettes are an abstract way of representing a subject by illustrating only the shapes and figures essential for recognition. They originally gained popularity because they were easier and less expensive to commission than miniature portraits, which Victorians felt fancy-schmantzy carrying around.

Anyways - in addition to being lovely and a bit romantic somehow, they're also dead easy and make excellent gifts.

To start out: Take a relatively high quality photo of your subject in profile AKA to-the-side. (An infinitely complicated process when your subject is a squirmy almost-one-year old.) It should look relatively like this:
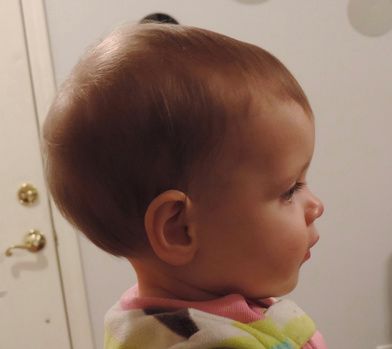
OMG is she so cute or what?!
Gather yo materials: All you need is a frame (I used an 8x10 for this project which seems to work nicely), a large piece of white card stock, a regular sized piece of black card stock, an x-acto knife with a very sharp blade, some bits of tape, and a glue stick. Resize the photo in Word (or Photoshop if you're a fancy bugger) to fit the dimensions as your frame and print it out.
Next, create the silhouette: Use some bits of tape to affix the printed photo to the black card stock. If you have problems with the picture, for example - not being able to see Reece's neck because of her jumper...use a pencil to create new guidelines that will make the silhouette more clear after cutting (sorry, no pic). Using your x-acto knife, very carefully and slowly cut around the outline edges of the picture and along any new pencil lines. Below is a photo of mine after cutting halfway around.
Keep going slowly and carefully till you've traced the entire printed photo. Personally, I like to add tiny little tufts of hair that stick up just slightly to give the back of the head more texture than just looking like a balloon with a face, but that's up to you (really really hard to show in a picture at this distance). Eventually - this what you get:
Lastly: Cut down the white paper to the size of your frame, then use a glue stick to adhere the silhouette to the white paper. Just make sure the silhouette is straight and where you want it to sit in the frame before you stick it on the background.

Optional snazziness: use a white or silver pen to date the silhouette in a bottom corner. Frame it up and ta-da!
Total cost is really no more than your frame and it makes a lasting keepsake that parents love. Plus, (as I intend to) it's really fun to go back a few years later and do another to see how the silhouette changes. 

**Photo model provided by my niece and flower girl, Reece. Happy first birthday tomorrow, sweet pea!**

P.S. Curious about the wedding countdown? Just 11 days!!!

1 comment:

  1. I love it! I think I might make me one :) Congrats on the upcoming wedding! I am SO happy for you and miss you much.

    ReplyDelete

Thanks so much for your comment! I really love reading them and look forward to hearing what you have to say!